Securing The Docker Daemons Remote Connectivity
Earlier in this chapter, we saw how to configure the Docker daemon to accept remote connections. However, with the approach we followed, anyone can connect to our Docker daemon. We can secure our connection with Transport Layer Security (http://en.wikipedia.org/wiki/Transport_Layer_Security).
We can configure TLS either by using the existing Certificate Authority ( CA ) or by creating our own. For simplicity, we will create our own, which is not recommended for production. For this example, we assume that our host running the Docker daemon is dockerhost.example.com .
Getting ready
Make sure you have the openssl library installed.
How to do it…
- Create a directory on your host in which to put our CA and other related files:
$ mkdir -p /etc/docker/keys
$ cd /etc/docker/keys- Create the CA private and public keys:
$ openssl genrsa -aes256 -out ca-key.pem 4096
$ openssl req -new -x509 -days 365 -key ca-key.pem \
                  -sha256 -out ca.pem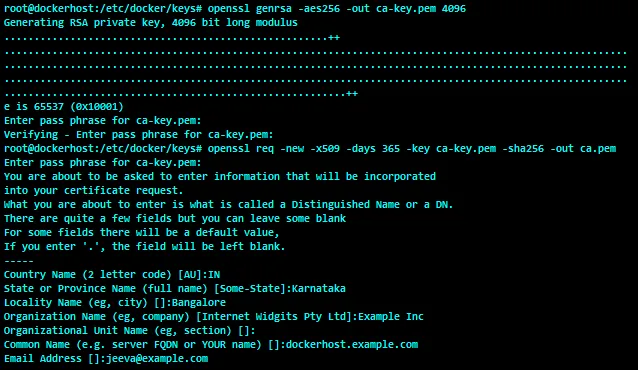
- Now, let’s create the server key and certificate signing request. Make sure that the common name matches the Docker daemon system hostname. In our case, it is
dockerhost.example.com:
$ openssl genrsa -out server-key.pem 4096
$ openssl req -subj "/CN=dockerhost.example.com" \
                  -new -key server-key.pem -out server.csr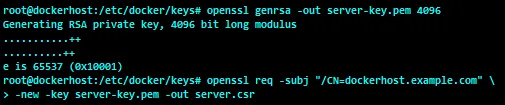
- Clients can connect to the Docker daemon using the Docker host’s DNS name or IP addresses. So, the DNS name and the IP addresses must be crafted into the certificate as an extension. Also, add the Docker daemon key’s extended usage attributes to be used only for server authentication. Both these pieces of information are captured in the
extfile.cnf, as shown here:

Here, 192.168.33.101 and 10.0.2.15 are the IP addresses of two network interfaces, and 127.0.0.1 is the loopback address.
- Continue on to generate the key:
$ openssl x509 -req -days 365 -sha256 -in server.csr \
                    -CA ca.pem -CAkey ca-key.pem -CAcreateserial \
                   -out server-cert.pem -extfile extfile.cnf
- For client authentication, create a client key and certificate signing request:
$ openssl genrsa -out key.pem 4096
$ openssl req -subj '/CN=client' -new -key key.pem \
                  -out client.csr
- To make the key suitable for client authentication, create an extension configuration file and sign the public key:
$ echo extendedKeyUsage = clientAuth > client-extfile.cnf
$ openssl x509 -req -days 365 -sha256 -in client.csr \
                   -CA ca.pem -CAkey ca-key.pem -CAcreateserial \
                   -out cert.pem -extfile client-extfile.cnf
- After generating
cert.pemandserver-cert.pem, we can safely remove both certificate signing requests:
$ rm -rf client.csr server.csr- In order to protect keys from accidental damage, let’s remove write permission from these key files:
ca-key.pem,key.pem, andserver-key.pem. Moreover, let’s limit the read permission for these files to just theroot:
$ chmod 0400 ca-key.pem key.pem server-key.pemThe certificate files ca.pem , server-cert.pem , and cert.pem need a broader read access, so let’s give read access for all these certificate files, as shown here:
$ chmod 0444 ca.pem server-cert.pem cert.pem- Stop the daemon if it is running on
dockerhost.example.comusing thesystemctl stop dockercommand. Then, start the Docker daemon manually from/etc/docker/keys:
$ dockerd --tlsverify \
              --tlscacert=ca.pem \
              --tlscert=server-cert.pem \
              --tlskey=server-key.pem \
-H=0.0.0.0:2376- From another terminal, go to
/etc/docker/keys. Run the following command to connect to the Docker daemon:
$ cd /etc/docker/keys
$ docker --tlsverify \
           --tlscacert=ca.pem \
           --tlscert=cert.pem \
           --tlskey=key.pem \
           -H=127.0.0.1:2376 version
The Docker client is able to seamlessly connect with the Docker daemon over TLS and get the server version.
How it works…
Once we configure the Docker daemon to use TLS as the transport, it only accepts secure TLS connection for the client, and fulfills the client’s request.
There’s more…
In this recipe, we used the --tlscacert , --tlscert , and --tlskey options of docker command to connect to the TLS enabled Docker daemon. Invoking the docker command using such a long list of options is quite klutzy. However, we can get around this issue by doing the following:
-
Copy the
ca.pem,cert.pem, andkey.pemfiles to the user’s$HOME/.dockerdirectory. -
Modify the file ownership to that user using the
chowncommand. -
Set
DOCKER_HOSTto the daemon address as shown here:
$ export DOCKER_HOST=tcp://127.0.0.1:2376- Set
DOCKER_TLS_VERIFYto1, as shown here:
$ export DOCKER_TLS_VERIFY=1Now, you can run the docker command as if you were running it on the Unix socket.
In this recipe, we launched the Docker daemon from the shell prompt, which is good for testing. However, the Docker daemon must be configured to start using Systemd. You can achieve this by editing the unit file of the Docker service, as outlined in the Configuring the Docker daemon for remote connectivity recipe, with the following noted exception for ExecStart :
ExecStart=/usr/bin/dockerd \
             --tlsverify \
             --tlscacert=/etc/docker/keys/ca.pem \
             --tlscert=/etc/docker/keys/server-cert.pem \
             --tlskey=/etc/docker/keys/server-key.pem \
             -H=0.0.0.0:2376
Here, we have separated the command in multiple lines for intelligibility. However, it must be in a single line in the unit file.
- The
curlcommand can also securely connect to the TLS-enabled Docker daemon, as shown here:
$ curl --cacert ${HOME}/.docker/ca.pem \
    --cert ${HOME}/.docker/cert.pem \
    --key ${HOME}/.docker/key.pem \
    https://127.0.0.1:2376/version
See also
- The documentation on the Docker website: https://docs.docker.com/engine/security/https/